Saturday, 23 February 2013

Flemish coif


2 updates in a night! Totally makes up for not coming through on the last one, right? O_O

1490 FLEMISH COIF
The pattern I used was stolen completely from Sevenstarwheel. Here is the link: http://sevenstarwheel.files.wordpress.com. I was referred to it by a friend and I really wanted to try it because:
  • It's well thought-out and based on period sources,
  • The construction is simple and practical and makes sense, and 
  • It is very economical, with 1 square yard making 2 coifs, something I think is very important when considering period construction techniques.
I didn't change anything about the pattern because she says she has a small head, and I do too. I followed the instructions, using the triangular half of a square foot of white linen and some white-ish linen canvas for reinforcing. 

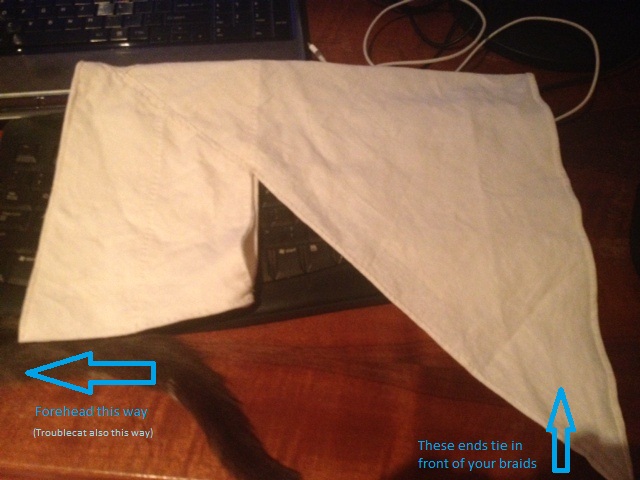
Here's a picture showing the triangle insert that goes on the crown of your head. The tip of that large traingle you can see pointing to the left is set into the brim and points toward the forehead:
And here it is a ventral view:


Here is my step-by-step guide on how to wear it!

1. Put your hair in two braids, using a centre-part. You don't even have to do it neatly! I certainly didn't:
 2. Put your head through the weird-looking hood like you would a headband... or a noose. Make sure the triangle bit falls over the other bit - so you look like you're wearing a bib:
 3. Pin your braids on top of your head:
 4. Pull the thing back up your face by dragging on the triangle. Tie the ends of the triangle in a single knot (some period images show what might be a little bobbley double knot, too). It doesn't have to be very tight to stay on, which is great. You need to kind of roll the edges of the triangle in as you pull them up, otherwise it looks stupid. Tuck the ends of the triangle under the sides:
 5: Fold the brim back:
6: Ta-dah!

I'm very happy with it. It's super comfy, looks like it should and stays on without a problem. YES. Even more excitingly I have another triangle from which to make another hood, and two should be plenty to do me for now. Hooray!

More about the skirt soonish, I have some pics already but you've already had two updates for tonight. Back to work for me. :-/

~EC x 

1490 kirtle update

Hi ladies and gents!

I know I promised an update some time ago but I've been a little busy with my Honours obligations and, you know, priorities. *sigh* Anyway, I've been plodding along with a couple of little things and I've made some good progress on some of my sewing, even though I've only picked it up for an hour or so a few times each week.

Things I have done:

  • Put together my kirtle bodice, flat-felling all the seams;
  • Cut out and sewn up my experimental Flemish coif;
  • Worked eyelets in the back closure of the bodice;
  • Cut out the kirtle skirt.
It actually looks like a lot more as a list than it felt doing it, which is actually kind of nice for a change. Not sewing to a deadline is really wonderful. I'd strongly recommend it.

1490 KIRTLE BODICE
So.. Pics and stuff! I backstitched the load-bearing bodice seams using natural-coloured linen thread, not coloured thread, since that apparently wasn't the way it was done. Then I flat-felled with dyed cotton thread - I try not to use silk for common garments because apart from being inappropriate to the class it washes REALLY BADLY in the machine (read: all of your clothes will come apart). Cotton was my choice because I couldn't afford enough linen thread to fell the seams as well. My felling stitches are really tiny (every 2-3 warp/weft threads) so it would take a lot of the coarser linen thread to make it happen. It wasn't the aim of the game for this kirtle.

Here's the bodice all sewn up:
 Here are my flat-felled seams:
 This is what happens when you put sewing down to check the photo you've just taken:
Holding the bodice together (more on the coif in the next post):
Eyelets all done! The bodice holds itself on, is comfy and supportive:
 From the side:
 From the back (spiral lacing holes with 1" spacing, worked in gold linen thread):
TIP: BASTE EVERYTHING (Even if you're using pins. Do it. It doesn't take long).

Another post coming soon about the coif! Real soon, like half an hour or so because I have it mostly written but want to be able to remember where I put my updates.

~EC x

Friday, 8 February 2013

I'm back!

Hi kids!

I'm back from my wonderful Tassie adventure. It was the best time I've had in forever and I can't WAIT to finally move there. Luckily, my job offer comes with a pile of incentive to start at the beginning of October and my Honours supervisor has agreed to help/let me finish up sooner! Things just have a way of working themselves out, I think.

Anyway, back to the whole tailoring thing!

As you might have noticed, my vintage wardrobe malarky was biting off a little more than I could chew, but it served its purpose in making the time leading up to my Christmas trip pass a lot more quickly.

While I was in Hobart the eternally lovely and talented Teghan fitted me with a bodice toile for a late-15th century short-sleeved kirtle. It is based on a couple of images from La Roman de la Rose in the Heurs a Louise de Savoy, c.1490:


These are essentially the two images I've based my first outfit on. There is not a great deal in the first image to identify the woman's station, except perhaps her belt. If the bed is meant to be hers, I'd consider her station moderately high. By my reckoning the outfit should contain the following list of garments:
  • White linen chemise with square neckline and straight sleeves,
  • White linen partlet,
  • White linen cap, tying at the crown,
  • Hose (silk, lined with linen is my choice),
  • Linen kirtle with square neck and 1/4-length sleeves,
  • Woolen hood with liripipe,
  • Woolen gown with square neckline, straight sleeves and contrasting taffeta turnbacks,
  • Linen apron,
  • Appropriate shoes.
Because I'm a cautious type of person I decided to make a full version of the kirtle out of burgundy linen to see if the pattern needs to be tweaked before I make anything else. This idea is thorough. I like thorough. Thorough is good. As a bonus, if everything goes well I'll have a comfy basic kirtle as a good starting point. Hooray!

So here is my toile. We patterned the sleeve after the photos were taken, sorry, but you'll get the gist.


I'm not sure the photos do it justice, but Teghan was just as thorough and careful as I like to be when I pattern others. It was such a pleasure and I'm SO HAPPY with the very very comfy result.

This is the fabric I've chosen. The top fabric and lining are both fairly lightweight linen, so I decided to interline the front and back panels with some lightweight cotton canvas I had in my stash.

Here's the first sleeve, on its way to being done:

And here are a pair of sleeves, ready to be attached once the bodice is complete:


I finished off a square-necked chemise while I was in Tassie, it's very light and should be comfortable and I'm happy with it as my first attempt at the style (even though I had to unpick and reattach the right sleeve because I sewed it on inside-out the first time, guh!).

I've cut the bodice to be back-lacing, like the one in the image above, but I'm kind of regretting it now because it's going to be that bit more challenging to chuck on. Oh well, live and learn.

Next time: the finished bodice (at least!).

xxxE

Tuesday, 18 December 2012

Wardrobe Zerg: 6 Sleeps, eek!

Whew! So today I did get most of the things on my To Do List done, although I don't have photos for all of them and will need to catch you up tomorrow or Thursday with them. I did get the whole bodice for Blue Floral made up though, and I have photos! I'm actually really happy with how it's turned out so far and I hope it ends up being as good as it promises to be.

So I evened up the facing to match the front and back panels that I'd fitted on my model I assembled the thing in about 2-3 hours, taking my time and watching The Forsyte Saga on iView, which is a well-written and very pretty period drama (if you're into that sort of thing... I doubt anyone would be surprised that I am!). Obviously the zip can't be inserted until the skirt is attached and I need to put buttons on the shoulders - for the minute I just pinned it so I could show you.

Front:
Side:

The neckline isn't sitting quite properly but I think that'll be sorted by attaching the buttons tomorrow and letting the shoulders sit more naturally - one pin in each just makes them stick out all funny. I've turned up the seam allowance to my natural waist so you can see that it sits pretty smoothly. There's about 10mm SA there currently, but I reckon that will increase to 15mm once the buttons are on the shoulders and the bodice sits properly - I'll have to remember to check it.

All in all it's sitting smoothly and comfortably without being at all tight and strained, so I'm really pleased. I'm definitely going to pleat the skirt, rather than gather it as per the pattern. I'm going to try for box pleats I think but knife pleats are an easy fall-back if there's too much skirt for box pleats to handle (which I suspect will be the case).

To finish Blue Floral:

  • Understitch facing and slipstitch to secure,
  • Attach buttons to shoulders, 
  • Check fit for waistline,
  • Run up, press and attach skirt (box/knife pleats),
  • Put in the zip,
  • Hem,
  • Ribbon belt.
I hope it shouldn't take me more than about 2-3 hours all up to finish it, so Thursday for sure. Then on to Yellow Batiste!

Monday, 17 December 2012

Vintage Wardrobe: 7 Day Failpost

Well, basically I haven't done much today because staying up so late for the last few nights has taken it's toll and I'm azzhausted. I'm really much more of a morning person, so instead of killing myself tonight I'm heading to bed so I can get up at my normal time and kick today's goals tomorrow.

I have a 6:30pm netball game on Wednesday but hopefully I'll be able to do some stuff in the morning before work and be home from netball in time to set up for Thursday. Wednesday is also my last day of work for the year so Thursday is going to be Sew All The Things Day! And Friday, too. And Saturday. And Sunday morning. So basically I'd like to have most of the things cut out and ready to go before Thursday so I can smash them out.

Ooookay, so I typed the previous 2 paragraphs at 9pm and fell asleep on my keyboard. Wups. The general gist of the other things were that I found some good patterns on the Burda website for side-button pants and a collared blouse. I decided I'll cut down the jacket pattern and turn it into a bolero. Somehow. The silk skirt will be A-line and the linen one will be a 10-gore circle skirt. I really, REALLY want at least one hat. Preferably a sunhat. I found a pattern for gloves. O_O Yes.

Urrr, that's it. Bedbedbed. More updates tomorrow!

xxx E

Sunday, 16 December 2012

Vintage Wardrobe: T-minus 8 days and counting...

So most of the sewing I did today is secret-squirrel Christmas present stuff, so I can't really share it here just yet. Sorry :( I also ran up a few of the new Christmas stockings that my mum decided to make for this year, and I promise to post a photo on Christmas Eve when they're all hung up on the mantelpiece and looking beautiful.

So, that being said I figured I needed to at least kick one goal on this project today, because there's not really enough time left for me to fall into bad habits already. I pinned together the bodice for Blue Floral and fitted it on my tailor's model. The pattern I had for it was actually a size 14 because I could only get the larger size 14-22 pattern at the time and I figured "oh bugger it, if I can fit an Elizabethan corset I can surely fit a dress bodice"... Which may or may not have been the right decision. :D

Anyway, here is what the bodice looked like after my fudged cutting down of the  bodice from a 14 to what I hoped would be about a 10 (to give me a little extra fabric in case my judgement sucked, basically):
 So, you can see it's not exactly sitting very well. Compared to the design image (here) it basically hangs like a bit of a sack. But it's oooookaaaay, since I pretty much expected it and I own a tailor's model HOORAY! They are the best and most handiest tools ever.

The main issues I can identify are: too loose across the decolletage, shoulders too wide, generally too loose, waist sitting too low (you can see the waistline mark transferred on to the fabric sitting almost an inch below my waistline where I've creased it on the model). So this is a list of the adjustments I made:

  1. Lifted the whole of the bodice to bring it in at the shoulders. The back actually needed to come up a fair bit more than the front to adjust for what was probably some dodgy guesswork when cutting out the pieces. I trimmed the shoulders back down to give the 15mm seam allowance (SA). 
  2. Side seams taken in by 8-10mm on each side. I left the darts as they were because I think they work pretty well and the side seams were basically vertical (i.e. the pattern pieces are even). Trimmed SA.
  3. Reshaped the armscye to round it out again after taking the shoulder seams up. This an the shoulder seam adjustment fixed the problem of the front panel being too loose)
  4. Trimmed the neckline on both panels to reflect the shoulder seam adjustment. Kept 15mm SA.
Here's the result:

It looks much better, don't you think? The waistline is where it should be, the pattern is fitted without being tight and all of the unnecessary wrinkles are gone. I actually took this picture halfway though trimming the front neck so you could see how I cut it away. It's not sitting perfectly but that's because it still has the SA turned up.

So now I'm happy with the way it looks, I just need to make sure the changes are reflected in the facing pieces, and I'll probably pin it on myself tomorrow to check the fit.

My To Do list for tomorrow:
  • Trim facings and do a quick fitting on myself,
  • Choose a colour of linen from my stash for the circle skirt. I think I've decided to do a 10-gore skirt based on McCalls 4064 (link).
  • Cut out the skirts, jacket and white blouse.
  • Set up my desk as a sewing table ready for sewing.
  • Go to bed by 10pm.
On that note, and as it's 2246, I really should sleep. Nightnight!

Saturday, 15 December 2012

Vintage Clothing Zerg: 9 SLEEPS!

Okay, 1 day down and I haven't done a whole lot... meep.

I have a confession - I already have the Aqua Print dress made. I have to finish the cummerbund that goes with it but it's really pretty much done.

So today I had Christmas things with my dad but I did manage to cut out and mark up the Yellow Batiste and Blue Floral dresses. Here are some scraps to show you what the fabric looks like:

I really wanted to get a border pattern fabric for what is now Blue Floral, but I just couldn't find any anywhere. I don't think it'll matter in the end. I think I'm going to change the pattern a little: knife-pleat the skirt (instead of gathering) and making a ribbon belt that I'll pin with a brooch if I can find something suitable (rather than another cummerbund).

These are the buttons for the shoulders of Blue Floral. I got them for a hefty 30c each at Spotlight a few months ago and stashed them. I only have eight of them, but I'll just use four on each shoulder and make it work.

Okay, so that's enough for tonight! Here's my current list:
Aqua print dress *finishing touches*
Blue floral dress *cut out/marked*
Yellow batiste dress *cut out/marked*
White lawn blouse 
Sleeveless blouse
Green collared blouse
Printed silk skirt
Linen bias-cut skirt
Cotton/linen jacket
Slacks 
Scarves
Hat